Sunday, December 13, 2009

WSO2 ESB Tips & Tricks 03: Transport Switching

Back to WSO2 ESB Tips and Tricks!
Today we are going to see how to implement a transport switching scenario with WSO2 ESB. WSO2 ESB supports receiving and sending messages over following transport and application layer protocols.
  • HTTP/HTTPS
  • Mail protocols (POP3, IMAP, SMTP)
  • JMS / AMQP
  • VFS (Virtual File System)
  • FIX (Financial Information eXchange)
  • TCP
  • UDP
With WSO2 ESB having support for such a wide range of transports, it is easy to implement a scenario which involves receiving messages over one protocol and forwarding them over another. As an example I’m going to explain how to receive messages over HTTP and forward them over JMS, using Apache Active MQ as the JMS provider. Looking at how most system integrators use WSO2 ESB it seems this is one of the most common use cases for ESB products.
The first thing we have to do is enable the JMS transport sender in the ESB. By default only the HTTP and HTTPS transports are enabled in the ESB configuration. But configuring and enabling other transports is a trivial task. Transports can be enabled by uncommenting the corresponding entries in the axis2.xml file or by using the ESB management console.
First, shutdown the ESB if it is already running. Then we need to deploy the Active MQ JMS client libraries into the ESB runtime. Download and extract an Apache Active MQ binary distribution (I prefer v5.2). Copy the following jar files from the Active MQ lib directory to the ESB_HOME/repository/components/lib directory.
  • geronimo-j2ee_management.jar
  • activemq-core.jar
Also this would be a good time to start the Active MQ broker.
Now start the ESB. The underlying Carbon platform will detect the newly deployed jar files and automagically convert them into OSGi bundles on the fly. Once the server has started go to the ESB_HOME/repository/components/dropins directory and do a file listing. You will see a set of OSGi bundles created out of the jar files you deployed.
Now that the server is up and running login to the management console as an admin. Click on ‘Transports’ under ‘Manage’ on the left navigation bar. A list of available transport receivers and senders will be displayed.

Select the ‘Enable’ option for the JMS sender. Click on ‘Enable’ to start the JMS transport sender. Once started, you can further configure the transport by specifying various parameters. But for this demonstration we can go ahead with the default settings (ie no parameters).

If you prefer to enable the JMS sender the old school way open up the axis2.xml file in the conf directory and uncomment the following entry before starting the ESB.
<transportSender name="jms" class="org.apache.axis2.transport.jms.JMSSender"/>
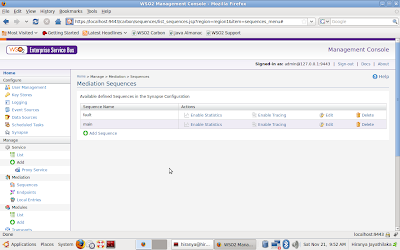
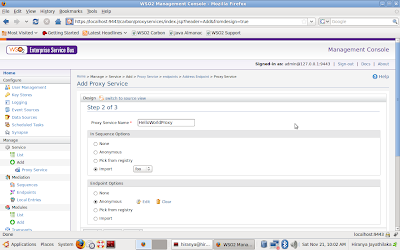
Having enabled the JMS sender, we should now create a proxy service which will accept messages over HTTP and send them to a JMS endpoint. Click on ‘Add’ under ‘Proxy Services’ to start the proxy service creation wizard. On the first step simply specify a suitable name for the service (eg: JMSBridge) and click on ‘Next’.

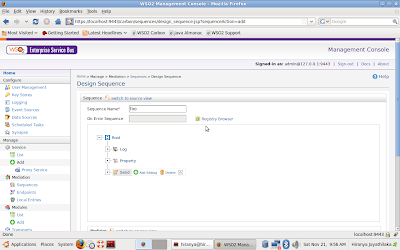
On the second step of the wizard, create an anonymous in-sequence consisting of a property mediator. Configure the property mediator to set the ‘OUT_ONLY’ property to the value ‘true’. Save the in-sequence and create an anonymous endpoint for the proxy service. Specify the following JMS EPR as the target address. This EPR points to a dynamic queue named ‘SimpleStockQuoteService’ in Apache Active MQ broker.
jms:/SimpleStockQuoteService?transport.jms.ConnectionFactoryJNDIName=QueueConnectionFactory&java.naming.factory.initial=org.apache.activemq.jndi.ActiveMQInitialContextFactory&java.naming.provider.url=tcp://localhost:61616&transport.jms.DestinationType=queue
In this scenario we will be doing a one-way invocation using the sample client application. In other words, the client sends a message to the ESB but does not expect a response in return. So the ESB should not expect a response from the backend JMS service either. We indicate this to the ESB by setting the OUT_ONLY property in the in-sequence of the proxy service. ESB will not register any call backs for messages containing the OUT_ONLY property thus no response would be expected.
Having specified the in-sequence and the target endpoint click on ‘Next’ to proceed to the third step of the wizard. Leave the out-sequence and the fault-sequence settings unchanged and simply click on ‘Finish’ to save and exit the wizard. A new proxy service will be deployed on the ESB at this point.
If you prefer to create the above proxy using the ESB configuration language you can use the XML snippet given below.
<syn:proxy name="JMSBridge" transports="https http" startOnLoad="true" trace="disable">
<syn:target>
<syn:endpoint>
<syn:address uri="jms:/SimpleStockQuoteService?transport.jms.ConnectionFactoryJNDIName=QueueConnectionFactory&java.naming.factory.initial=org.apache.activemq.jndi.ActiveMQInitialContextFactory&java.naming.provider.url=tcp://localhost:61616&transport.jms.DestinationType=queue"/>
</syn:endpoint>
<syn:inSequence>
<syn:property name="OUT_ONLY" value="true" scope="default"/>
</syn:inSequence>
</syn:target>
</syn:proxy>
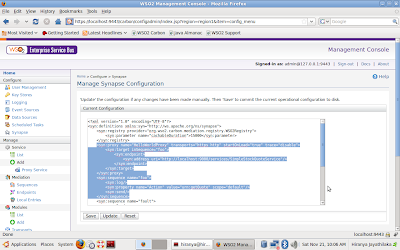
On the management console, click on the ‘Synapse’ link under ‘Configure’ and add the above XML as a child of the top level ‘definitions’ element. Click ‘Update’ to apply the changes.
Now we are all set to run the scenario. Deploy the SimpleStockQuoteService into the sample Axis2 server. Open up the axis2.xml file for the sample Axis2 server and enable the JMS transport receiver in it. This file can be found at samples/axis2Server/repository/conf directory. To enable the JMS listener uncomment the following XML fragment.
<transportReceiver name="jms" class="org.apache.axis2.transport.jms.JMSListener">
......
</transportReceiver>
Finally start the sample Axis2 server. Since we have enabled the JMS receiver for the sample server, the SimpleStockQuote service will be exposed over JMS and the server will start listening on a JMS queue named ‘SimpleStockQuoteService’. When you haven’t specified a queue name in the service configuration, the Axis2 JMS transport will by default listen on a queue with the same name as the service. To explicitly specify the queue name for a service one must set the transport.jms.Destination parameter as a service parameter (ie in the services.xml file).
Finally go to samples/axisClient and run the following command to send a one-way message to the ESB proxy service over HTTP. (Here we invoke the in-only placeOrder operation on the backend service)
ant stockquote –Daddurl=http://localhost:8280/services/JMSBridge –Dmode=placeorder
The ESB will take the message and forward it over JMS to the queue named ‘SimpleStockQuoteService’. The sample Axis2 server which is currently listening on this queue will pick up the message and process it. Note the following log entry in the Axis2 server log when it takes the message from the JMS queue.
Sun Dec 13 16:15:39 IST 2009 samples.services.SimpleStockQuoteService  :: Accepted order for : 5789 stocks of IBM at $ 89.61765128551305
So there you have it. The proxy service abstraction in WSO2 ESB makes it extremely simple to perform protocol conversions and route messages back and forth. I suggest you also have a look at the set of transport switching samples that come with WSO2 ESB distribution. We got samples covering all the major protocols and even some of the domain specific transports like FIX and AMQP.
In my next post, I will focus on common problems that most developers encounter while implementing transport switching scenarios involving JMS and possible solutions to such pitfalls.

Friday, December 4, 2009

Introduction to Apache Synapse @ Apache Asia 2009

Yesterday (3rd December 2009) I conducted a technical presentation titled “Introduction to Apache Synapse” at the Apache Asia Roadshow 2009 held at Colombo, Sri Lanka. For everyone’s benefit I have published the presentation slides on SlideShare. The presentation went well, and so far I have received pretty good feedback from the participants. There were a few very interesting questions from the audience at the end of the session too.
In this presentation I have addressed the areas like problems of enterprise integration, ESB pattern, key features of Synapse, Synapse architecture and the configuration model. I hope you will find it interesting and useful.

Wednesday, November 25, 2009

WSO2 ESB Tips & Tricks 02: Content Based Routing

Content based routing (CBR) is one of the most fundamental and widely used features of an ESB. Most integration scenarios involve situations where we need to analyze the content of a message and route it to a predefined endpoint based on the results. Depending on the actual requirements the ESB will have to inspect the message headers, message body or both.
For an example take a situation where you have two servers, server-A and server-B, that host an order processing service. Assume that server-A takes an hour to process an order whereas server-B takes over two hours. You could use something like WSO2 ESB to do CBR and provide a better service to the clients who are placing order requests on the servers. You can configure the ESB to analyze the request content and somehow identify the high priority requests based on a certain criteria. Such requests can be forwarded to server-A and the other requests can be forwarded to server-B. This way you can assure a better service to the clients who are placing high priority orders.
So how exactly do we implement a CBR scenario with WSO2 ESB? WSO2 ESB provides mediators like the filter mediator and the switch mediator for this task. I will now explain how to employ the filter mediator and get a simple CBR scenario up and running with WSO2 ESB.
Start the server and login to the management console. Click on “Sequences” and select the “Edit” option for the “main” sequence. Start by deleting all the child mediators already present in the sequence. To delete a mediator simply click on it and select the delete option from the little popup thingy that appears.
Now add an “In” mediator and an “Out” mediator to the sequence. Then add a “Filter” mediator as the first child of the “In” mediator. “Filter” mediator will appear on the editor with two more child mediators – “Then” mediator and the “Else” mediator. Let’s leave them as they are for the moment and configure the “Filter” mediator as follows.
On the “Filter” mediator configuration form (just below the editor window) select the “Source and Regular Expression” option. If you cannot see this form on your browser just click on the “Filter” mediator icon on the editor and it will appear on the screen. Specify the following parameters for the source and regular expression fields.
  • Source: //m0:getQuote/m0:request/m0:symbol
  • Regex: IBM
Now click on the “Namespaces” link and define the following namespace.
  • Prefix: m0
  • URL: http://services.samples
Exit the namespace editor popup and click on the “Update” button to save the changes made to the “Filter” mediator configuration. Now click on “Then” mediator and select the “Add Child” option from the little popup menu. Add a “Send” mediator as the child of the “Then” mediator. Specify an anonymous endpoint for the send mediator. Provide the address http://localhost:9000/services/SimpleStockQuoteService for the anonymous endpoint.
Once you are done with that click on “Else” mediator. Again add a “Send” mediator as a child. Specify the address http://localhost:9001/services/SimpleStockQuoteService as an anonymous endpoint for the send mediator.
Finally add another “Send” mediator as a child of the “Out” mediator which we added earlier. Do not specify any endpoints for that.


Save and close the sequence editor. We are now ready to run the scenario.
If you prefer to work with the Synapse configuration language and want to implement this scenario by manually editing the configuration you can use the following XML sequence configuration. Simply click on the “Synapse” link under “Configure” in the management console and locate the configuration for the “main” sequence. Replace it with the following XML snippet.
<syn:sequence name="main">
<syn:in>
<syn:filter xmlns:m0="http://services.samples" source="//m0:getQuote/m0:request/m0:symbol" regex="IBM">
<syn:then>
<syn:send>
<syn:endpoint>
<syn:address uri="http://localhost:9000/services/SimpleStockQuoteService"/>
</syn:endpoint>
</syn:send>
</syn:then>
<syn:else>
<syn:send>
<syn:endpoint>
<syn:address uri="http://localhost:9001/services/SimpleStockQuoteService"/>
</syn:endpoint>
</syn:send>
</syn:else>
</syn:filter>
</syn:in>
<syn:out>
<syn:send/>
</syn:out>
</syn:sequence>
Before we run this scenario let’s try to figure out what it is supposed to do. The “In” mediator will take all the incoming requests and hand them over to the “Filter” mediator which evaluates an XPath expression on the content (Yes – this is the XPath we specified as the 'Source' parameter earlier. It simply extracts a text value from the SOAP payload). We extract a value from the message payload and perform a regular expression match on it (Out regex is “IBM”). If the regular expression matches, the message will be handed to the “Then” mediator or else it will be given to the “Else” mediator. Both these mediators invoke the “Send” mediator but on two different endpoints, so that the incoming requests are sent to one of two endpoints depending on the result of the XPath evaluation and the regular expression match. The “Out” mediator grabs all the responses coming back from the endpoints and invokes the “Send” mediator. Since we haven’t specified a target endpoint for this “Send” mediator, responses will be sent back to the clients based on the addressing information available on the message.
That sounds simple enough. Let’s run this scenario. First go to the directory ESB_HOME/samples/axis2Server/src/SimpleStockQuoteService and deploy the sample service by running the command “ant” (you need to have Apache ANT installed). Then go to ESB_HOME/samples/axis2Server and run the following two commands on two different shells/command prompts. (Run the commands applicable to your platform)

Unix/Linux:
./axis2server.sh –http 9000 –https 9005
./axis2server.sh –http 9001 –https 9006

Windows:
axis2server.bat –http 9000 –https 9005
axis2server.bat –http 9001 –https 9006

These two commands will start two Axis2 instances, one running on port 9000 and the other running on port 9001. To invoke the sample client go to ESB_HOME/samples/axis2Client and execute the following command.
ant stockquote –Daddurl=http://localhost:8280 –Dsymbol=IBM
This will send a message to the ESB with the string “IBM” in the payload. This will match the regular expression and hence will be forwarded to the server running on port 9000. Check out the console where you started that server instance for confirmation. You should see something like this.
Wed Nov 25 18:48:57 IST 2009 samples.services.SimpleStockQuoteService :: Generating quote for : IBM
Now again invoke the client as follows.
ant stockquote –Daddurl=http://localhost:8280 –Dsymbol=MSFT
This will send a message to the ESB with the string “MSFT” in the payload and voila! The regular expression match will fail causing the message to be forwarded to port 9001. Check the Axis2 log for confirmation.
Wed Nov 25 18:48:49 IST 2009 samples.services.SimpleStockQuoteService :: Generating quote for : MSFT
So there you go – CBR made easy by WSO2 ESB. The filter mediator brings if-else like semantics into the mediation logic. The ESB also has a switch mediator. Just guess what semantics that can bring into the mediation. And then of course we have the router mediator to implement complex CBR scenarios. If you are interested in learning more about CBR support available in WSO2 ESB then you can have a look at the following samples. These 2 samples are shipped with WSO2 ESB so you can try them out all by yourself.

Friday, November 20, 2009

WSO2 ESB Tips & Tricks 01: Sequences and Proxy Services

As promised, here is the first article of the “WSO2 ESB Tips & Tricks” series. The main objective of this post is to introduce two very important functional components of the ESB, namely sequences and proxy services. These are perhaps the most commonly used functional components of WSO2 ESB. They can be used to implement even the most complex of messaging systems and enterprise integration patterns using the service bus. During the course of this article I will briefly explain some of the use cases of sequences and proxy services along with some useful information on how to use them in WSO2 ESB.
WSO2 ESB supports four modes of operation.
  1. Service mediation
  2. Message mediation
  3. Task scheduling
  4. Eventing
In the service mediation mode, WSO2 ESB acts as a proxy to a real Web Service hosted in a Web Services container like Apache Axis2 or WSO2 WSAS. The ESB exposes a virtual Web Service which can accept requests from clients. The requests are processed, mediated and forwarded to the actual service implementation by the ESB. Any responses coming from the service implementation are mediated and forwarded to the clients. Proxy services are used to get the ESB operating in this mode.
In the message mediation mode, WSO2 ESB functions as a message router. It can filter, transform, drop messages or forward them to remote endpoints for further processing when operating in this mode. Sequences are used to define the message mediation behavior of the ESB. A sequence is a series of mediators, where each mediator is an entity that can accept messages and carry out a predefined task on them. WSO2 ESB provides you with a wide range of mediators designed to carry out various processing tasks on the messages. You can mix and match these available mediators to develop sequences. For instance a sequence comprising of the log mediator and the send mediator will act as a simple log-and-forward message flow. You can have any number of mediators in a sequence and a sequence can also dispatch messages to other sequences if needed.
A proxy service is a combination of three sequences and a target endpoint. The target endpoint is for the actual service implementation to which the messages will be forwarded after mediation. The three sequences are as follows.
  • In-sequence: All the incoming requests to the proxy service are dispatched to the in-sequence. This sequence defines how the requests should be processed before forwarding them to the target endpoint.
  • Out-sequence: All the responses coming back from the backend service implementation are dispatched to this sequence. It defines how the responses should be handled before sending them back to the clients. The out sequence can also forward the responses to a given service endpoint, thus effectively linking up multiple services. This way a single request to the proxy service will trigger multiple service invocations. The response from the 1st service is fed to the 2nd service as the request.
  • Fault sequence: If an error occurs during service mediation the faulty message is handed to the fault sequence for error handling work. Depending on our requirements the fault sequence can be used log the error, ignore it or send a SOAP fault back to the client indicating that something went wrong.
Now that you have a basic understanding of sequences and proxy services let’s take a look at some of the use cases where these components come in handy. Proxy services can be used to expose an existing service over a different schema (message format). In scenarios like this one, proxy services can transform the messages flowing back and forth. Also since proxy services can be exposed over multiple transports they can be used to expose an existing service over a different transport. For an example we can take a simple HTTP service and expose it over JMS by creating a proxy service for the HTTP service and exposing it over JMS. The ESB will take care of switching the communication protocols. In addition, proxy services are useful in adding QoS features (security, RM etc) to ordinary message flows. As an example, we can take an unsecured service, create a proxy service for it and engage security on the proxy service to add security to the backend service implementation.
Sequences can be used to audit, filter, control and transform messages flowing through a network. Certain advanced features like access control, load balancing and fail over are also possible with sequences. In WSO2 ESB all the incoming messages which are not destined to a proxy service are dispatched to the “main” sequence. The main sequence can further distribute them to other sequences and they in turns can call even more sequences. This is somewhat analogous to how a C program works. The application runtime invokes the main procedure and it in turns can call other procedures.
Enough with the theory! Let’s get practical and see how to create sequences and proxy services in WSO2 ESB. Here actually you have several options. You can either use the XML based Synapse configuration language to define sequences and proxy services, or use the set of graphical tools that come with WSO2 ESB. To create a sequence graphically, first start the ESB server and logon to the management console. (By default the web based console is accessible at https://localhost:9443/carbon) Sign in as an administrator (By default the username and the password are both “admin”). Click on the “Sequences” option in the left panel. This will show you a list of existing sequences. By default the “main” sequence and the global “fault” sequence is listed on this page.
To create a new sequence, click on “Add Sequence”. This will bring up the on-line sequence editor. Start by giving a name to the sequence. Then go ahead and start adding mediators.
To further customize the behavior of a mediator instance click on the mediator and a dialog box will appear just below the sequence editor panel. Once you are done creating the sequence click on “Save” to save and close the editor. The newly created sequence will now show up on the list of available sequences.
Ceating a proxy service is just as easy. Click on the Proxy Service link in the left panel to start the proxy service creation wizard.
Simply go through the 3-step wizard and specify an in-sequence, target endpoint, out-sequence and a fault sequence for the proxy service. When specifying these items you can either import an already existing sequence/endpoint or create one on the spot by selecting the “Anonymous” option.
Once you finish the wizard the new service will get created and deployed on the server. If you gave the name “FooProxy” to the service it will be exposed on the HTTP endpoint http://localhost:8280/services/FooProxy.
Now if you click on the “Synapse” link on the left navigation bar you can see that the overall ESB configuration has been updated with your changes.
The UI also allows you to enable statistics collection on sequences and proxy services, enable tracing on them and modifying their configuration. Play around with the various options available to you and get familiar with sequences, proxy services and the ESB management console. We will be using these a lot in the days to come.

Thursday, November 19, 2009

New Kids in Town

The team at WSO2 just released the latest version of WSO2 Carbon (v2.0.2) along with a whole bunch of Carbon based products. Log on to the WSO2 Oxygen Tank to lay your hands on the following smoking hot releases, right from the WSO2 oven ;)
  • WSO2 Enterprise Service Bus v2.1.2
  • WSO2 Web Services Application Server v3.1.2
  • WSO2 Business Process Server v1.1.0
  • WSO2 Mashup Server v2.0.1
  • WSO2 Identity Server v2.0.2
You will be particularly interested in our Business Process Server and Mashup Server releases since we haven't done any releases of them for a fairly long time. Needless to say that all new releases have many new features, bug fixes and enhancements over the previous versions. So download today and experience the power of SOA.

Sunday, November 15, 2009

Introducing "WSO2 ESB Tips and Tricks"

WSO2 ESB has kept me quite busy for the last couple of months. The ESB 2.1 release in July was soon followed by a 2.1.1 release and work is now underway for the 2.1.2 release. That’s way too much activity in such a short period, for an open source project. Anyway, since I’m spending a lot of time working on WSO2 ESB, I thought I might as well blog about my work in a regular basis. So in the next few months, I will be publishing a series of blog posts regarding WSO2 ESB and how to use it to implement real life integration scenarios. This series of blogs, which I have named “WSO2 ESB Tips and Tricks”, will surely benefit many folks who are either just learning SOA concepts or looking to integrate a bunch of apps using an ESB.
You can consider this post to be the 0th article of the “WSO2 ESB Tips and Tricks” series. So before I move on to the 1st post of the series I think I should briefly describe what WSO2 ESB is and why you should consider it as an option for enterprise integration. So here goes:
WSO2 ESB is a fast and lightweight, enterprise service bus. It is based on Apache Synapse, the lightweight ESB from the ASF (speaking of which, “Happy Birthday ASF”). It supports many messaging standards including SOAP, WS-* standards and REST as well as a variety of application and transport layer protocols like HTTP/S, Mail, JMS, VFS, AMQP, TCP and FIX. WSO2 ESB comes with a rich collection of mediators and other functional components which can be used out of the box to implement even the most complex integration patterns. Message routing, transformation, protocol switching, load balancing, clustering and service chaining are some of the common features supported by WSO2 ESB. Controlling and managing WSO2 ESB is also a trivial task thanks to the Web based management. Many of the common system administration tasks such as user management, certificate management and statistics collection are all available as inbuilt features of the server and the management console. WSO2 ESB is shipped with an embedded WSO2 Governance Registry, which makes it easy to store and manage SOA metadata. In addition to that the ESB can be configured to work with an externally hosted WSO2 Governance Registry if needed.
WSO2 ESB is also based on WSO2 Carbon, the OSGi based components framework for SOA. WSO2 Carbon makes it possible to easily install and configure additional features into the ESB runtime. Custom code and third part libraries can also be deployed into the server without any hassle.
Perhaps the best thing about WSO2 ESB (apart from it being super fast) is that it is totally free and open source. Binary and source distributions are available for download through the WSO2 Oxygen Tank. All artifacts are released under the business friendly Apache Software License 2.0. WSO2 also offers training and commercial support for users that require them.
As I have already mentioned a couple of times, WSO2 ESB is well known as a fast ESB. It can easily handle over 2500 transactions per second while maintaining constant memory usage. This level of performance is neither a coincidence nor an accident, but by clever and careful design. Two of the most significant features of WSO2 ESB architecture can be listed as follows:
  • Non-blocking HTTP transport : The HTTP server worker threads of the ESB do not get blocked over network I/O. The Apache HTTP Core-NIO based transport makes it possible to accept many concurrent connections and process more messages than any other Java HTTP transport implementation.
  • Pull Parsing and Streaming Model: WSO2 ESB uses Apache AXIOM, the StAX based XML infoset model. Therefore it does not build the object model for incoming messages, unless it has to. Incoming bytes are streamed through the ESB without touching the payload. This reduces memory usage significantly and also saves many valuable CPU cycles.
These architectural elements combine with the Carbon framework to deliver the best performance imaginable along with seamless modularization.
Some of the latest features that we have added to WSO2 ESB like rule based mediation and EDA (Eventing) support make WSO2 ESB suitable for implementing even the most complicated SOA platforms.
I think this explanation pretty much justifies why you should give WSO2 ESB a try. It is fast, feature rich and user friendly by all means. And don’t forget, it’s free and open source too. So grab a copy of the latest binary distribution today and get started. If you need any help we got tons of free documentation and articles on the WSO2 Oxygen Tank. This is in addition to our mailing lists and user forums.
I hope you will enjoy the “WSO2 ESB Tips and Tricks”.

Friday, September 18, 2009

A Tour to the Past

Something non-technical for a change today.....
I've always wanted to visit a museum and see some artifacts from the Jurassic age. I'm very enthusiastic about learning more about the giant lizards that roamed the earth millions of years ago and I've always wished that I could see those gigantic dinosuar fossils live, without a TV screen. Finally I got the opportunity when I was in Salt Lake City, Utah, a few weeks back. The Utah Museum of Natural History is a fascinating place with lots of things to see, learn and do. They exhibit some very rare artifacts illustrating the Jurassic ages, world history, American history, geography and plant and wildlife. What I liked most was that instead of just seeing stuff, the museum has lots of facilities where you can watch educational videos, read books and managazines and take part in interactive games and activities. The use of modern technology in the musuem is mind blowing.

The musuem has special admittance rates for University students (you just need to show your student ID) and they have a special gallery named "Toadally Frogs", dedicated to kids, featuring some rare species of toads and frogs.


It indeed was a wonderful and fulfilling experience vsiting the natural history musuem of Utah. If you are visiting Salt Lake City, make sure you allocate some time to go and visit this exceptional place. Oh and did I mention that they have a huge collection of natural minerals and rare stones along with a gallery full of live insects? You don't wanna miss those.


Saturday, September 12, 2009

Enterprise Messaging with Synapse, WSO2 ESB and WebSphere MQ

I've been recently playing a lot with Apache Synapse, WSO2 ESB and IBM WebShpere MQ (WMQ). My intention was to use WMQ as a JMS provider for Synapse and WSO2 ESB. IBM WebSphere MQ being a very popular and matured messaging solution, I figured that getting Synapse and WSO2 ESB to work with WMQ and document the integration process would really help the IBM, Apache and WSO2 communities. Originally I anticipated this application integration to be a very comlpex and tedious task. But for much of my delight, it turned out to be a very easy and simple process in the end. What was little complicated was to get WMQ properly installed and get its JMS features configured. But the integration with Synapse and WSO2 ESB was indeed a piece of cake.
So here I'm going to list the steps hat one should follow to get WMQ integrated with Synapse or WSO2 ESB. Start by downloading the required software. Binary distributions of Apache Synapse and WSO2 ESB can be downloaded from their respective websites. A trial version of the IBM WMQ V7.0 can be downloaded from here. In addition to these application you will also require Java 5 or higher along with Apache ANT to run some of the samples described here.
Installing Apache Synapse or WSO2 ESB doesn't require any additional steps. You simply need to extract the downloaded archives and that's all. However WMQ installation is not so easy. It is a fairly long and time consuming process which requires carefulness and patience. Anyway the installation process is well documented and so it shouldn't be a problem. For your convenience I'm describing the WMQ installation procedure for Linux here. The necessary commands to be executed at each step are given in italic font.

Installing WMQ
1. Create an empty directory and extract the downloaded WMQ archive into it
2. Add a new user group called 'mqm' to the system
groupadd mqm
3. Add a new user called 'mqm' to the system. Add the user to the 'mqm' group. Set the user's home directory to /var/mqm
useradd -d /var/mqm -g mqm mqm
4. Create the directory /var/mqm and change its owner to mqm
mkdir /var/mqm
chown mqm:mqm mqm
5. Create the directory /opt/mqm
mkdir /opt/mqm
6. Create another directory anywhere on the disk and set a symlink to it from /opt/mqm
mkdir /home/hiranya/mqm
ln -s /home/hiranya/mqm /opt/mqm
7. Install libstdc++5 library on the system (using Synaptic or apt-get on Debian/Ubuntu systems) if not already installed
8. As root go to the directory where WMQ is extracted and run the license display script
./mqlicense.sh
9. Install the MQ runtime and the server using rpm
rpm -ivh MQSeriesRuntime-7.0.0-0.i386.rpm MQSeriesServer-7.0.0-0.i386.rpm --nodeps
10. Install the MQ samples
rpm -ivh MQSeriesSamples-7.0.0-0.i386.rpm --nodeps
11. Install the MQ client
rpm -ivh MQSeriesClient-7.0.0-0.i386.rpm --nodeps
That wasn't too bad, was it? Now it's time to verify the installation. Here's what you got to do.

Verifying the Installation
1. Login as user mqm (ssh mqm@localhost)
2. Create a new queue manager
crtmqm -q venus.queue.manager
3. Start the queue manager
strmqm
4. Start MQSC program (a new shell will appear - without a prompt)
runmqsc
5. Define a local queue in the MQSC shell
define qlocal (orange.queue)
6. Terminate MQSC
end
7. Go to /opt/mqm/samp/bin and run the amqsput sample program to place a message on to the queue
./amqsput ORANGE.QUEUE
8. The above command should be followed up by some sample message text of your choice and a blank line
9. Run the following command to pull the message back from the queue
./amqsget ORANGE.QUEUE
10. So far so good! We got the server properly installed. Now on to the client!
11. Create a new queue manager
crtmqm -q saturn.queue.manager
12. Start the queue manager
strmqm
13. Start MQSC
runmqsc
14. Create a new queue
define qlocal (queue1)
15. Create a connection channel to the queue
define channel (channel1) chltype (svrconn) trptype (tcp) mcauser ('mqm')
16. Create a listener (specify a port)
define listener (listener1) trptype (tcp) control (qmgr) port (8585)
17. Start the listener
start listener (listener1)
18. Terminate MQSC
end
19. Create a system environment variable to point to the channel created above
export MQSERVER='CHANNEL1/TCP/localhost(8585)'
20. Go to /opt/mqm/samp/bin and run the amqsputc to place a message in the queue (using the client API)
./amqputc QUEUE1 saturn.queue.manager
21. Now run amqsgetc to receive the message
./amqgetc QUEUE1 saturn.queue.manager
22. Excellent! We got the client installed properly too :)
Now that we got WMQ installed let's try to get its JMS features enabled.

Setting Up JMS
1. Install WMQ classes for JMS
rpm -ivh MQSeriesJava-7.0.0-0.i386.rpm --nodeps
2. Start MQSC (This will start mqsc for the last created queue manager - saturn.queue.manager)
runmqsc
3. Define a JMS channel for the queue manager
define channel(java.channel) chltype(svrconn) trptypr(tcp)
4. Define a listener
define listener(listener.tcp) trptype(tcp) port(1414)
5. Start the listener
start listener(listener.tcp)
6. Setup the classpath variable and the MQ_JAVA_LIB_PATH to run the IVT programt
export CLASSPATH=/opt/mqm/java/lib/com.ibm.mqjms.jar:/opt/mqm/samp/jms/
export MQ_JAVA_LIB_PATH=/opt/mqm/java/lib
7. Go to /opt/mqm/java/bin and invoke the IVT sample program
./IVTRun -nojndi
./IVTRun -nojndi -client -m saturn.queue.manager -host localhost -channel JAVA.CHANNEL
8. If the IVT program can recieve and send JMS messages we are done! Now let's proceed to enabling JNDI support
9. Go to the /opt/mqm/java/bin directory and open the JMSAdmin.config file. Edit the PROVIDER_URL property to point to an empty directory of your choice on the file system. This directory will be used the JNDI provider source (eg: /var/mqm/jndi). If the specified directory does not exist in the file system create it.
10. Run the IVTSetup tool to create the default set of JNDI bindings
./IVTSetup
11. Now run the IVTRun tool as follows
./IVTRun -url "file:/var/mqm/jndi" -icf com.sun.jndi.fscontext.RefFSContextFactory
12. By now we have enabled and verified JNDI support. Let's use the JMSAdmin tool to make some modifications in the JNDI bindings
13. Fireoff /opt/java/bin/JMSAdmin and run the following commands:
ALTER QCF(ivtQCF) TRANSPORT(CLIENT)
ALTER QCF(ivtQCF) QMGR(saturn.queue.manager)
14. Run the IVTRun tool again as mentioned in step 11. This time messages will be sent to the saturn queue manager.
Now we are all set. It's time to get WMQ integrated with Synapse and WSO2 ESB. Let's start with Apache Synapse.

Synapse Integration
Follow the steps given below as the user 'mqm'. Trying to run Synapse as a different user caused some JMS security exceptions.
1. Copy the following jar files from /opt/mqm/java/lib to SYNAPSE_HOME/lib
  • com.ibm.mqjms.jar
  • fscontext.jar
  • providerutil.jar
  • com.ibm.mq.jmqi.jar
  • dhbcore.jar
2. Enable the JMS listener in the axis2.xml. Configure the default connection factory as follows.
<parameter name="default">
<parameter name="java.naming.factory.initial">com.sun.jndi.fscontext.RefFSContextFactory</parameter>
<parameter name="java.naming.provider.url">file:/var/mqm/jndi</parameter>
<parameter name="transport.jms.ConnectionFactoryJNDIName">ivtQCF</parameter>
<parameter name="transport.jms.ConnectionFactoryType" locked="false">queue</parameter>
<parameter name="transport.jms.Destination">ivtQ</parameter>
</parameter>
Note that we are using the JNDI configuration used by the IVT sample program. We are using the same queue connection factory and the JMS queue to define the default connection factory.

3. Create the following proxy service in the synapse.xml (this is a simplified version of sample 250)
<proxy name="JMSProxy" transports="jms">
<target>
<inSequence>
<log level="full"/>
<drop/>
</inSequence>
</target>
<parameter name="transport.jms.ContentType">
<rules>
<jmsProperty>contentType</jmsProperty>
<default>application/xml</default>
</rules>
</parameter>
</proxy>
4. Start Synapse - go to SYNAPSE_HOME/bin and run ./synapse.sh
5. Go to SYNAPSE_HOME/samples/axis2Client/src/samples/userguide and open the GenericJMSClient.java source file. Make the following changes in the code.
  • Set the jms_dest property default value to "ivtQ" (line 45)
  • Set the java.naming.provider.url to "file:/var/mqm/jndi" (line 82)
  • Set the java.naming.factory.initial to "com.sun.jndi.fscontext.RefFSContextFactory" (line 85)
  • Set the lookup key to "ivtQCF" (line 89)
6. Now from the SYNAPSE_HOME/samples/axis2Client directory run the following command to run the JMS client application which will send messages to the ivtQ.
ant jmsclient -Djms_type=pox -Djms_payload=IBM

7. At this point Synapse will pick the messages from the queue and log them on the console.

WSO2 ESB 2.1 Integration
Follow the steps given below as user 'mqm'
1. Copy the Websphere MQ client jars (mentioned above under Synapse Integration) to ESB_HOME/repository/components/lib
2. Enable the JMS listener in axis2.xml and configure the default JMS connection factory as follows
<parameter name="default">              
<parameter name="java.naming.factory.initial" >com.sun.jndi.fscontext.RefFSContextFactory</parameter>
<parameter name="java.naming.provider.url" >file:/var/mqm/jndi</parameter>
<parameter name="transport.jms.ConnectionFactoryJNDIName" >ivtQCF</parameter>
<parameter name="transport.jms.ConnectionFactoryType" >queue</parameter>
<parameter name="transport.jms.Destination">BOGUSQ</parameter>
</parameter>
Note that we have specified a queue named 'BOGUSQ' as the default destination. This is because we need to use ivtQ for our proxy service only. If we use 'ivtQ' here all the services deployed in ESB (XKMS, echo, wso2carbon-sts) will start listening on the same queue. You also need to login to JMSAdmin and create the queue named 'BOGUSQ'. In JMSAdmin shell run the following commands.
DEFINE Q(BOGUSQ) QMGR(saturn.queue.manager)
ALTER Q(BOGUSQ) QUEUE(QUEUE1)
If the QUEUE1 does not exist, first login to MQSC and create it.
3. Add the proxy service we used with Synapse to ESB_HOME/conf/synapse.xml
4. Start WSO2 ESB
./wso2server.sh -DuseSynapseXML
5. Use the sample client we used in Synapse to send messages to the queue

Wednesday, September 9, 2009

WSO2 Carbon Shines in Open Source Space

Awesome news folks!
WSO2 Carbon, the open source SOA platform, the team of which I'm also a part of, has won an award in "InfoWorld Best of Open Source Software (Bossie) 2009". Bossie awards cover a wide range of software categories and WSO2 Carbon won the award in the "Platforms and Middleware" category. With this, WSO2 Carbon has been recognized by InfoWorld as one of top 40 open source products available for business and IT. Here I quote the official announcement from InfoWorld which declares the award winners.
"Two leading lights of open source SOA are MuleSource and WSO2. The Mule ESB takes our prize for the finest enterprise service bus in the open source pantheon, while WSO2 receives a Bossie for its Carbon framework, the basis of a completely componentized SOA platform."
Fantastic.... Given the fact that WSO2 Carbon is still a very new software platform, this is a great achivement indeed. It just shows how fast WSO2 Carbon has matured as a complete SOA platform and how fast its community has expanded in the last few months.
Read the complete publication from InfoWorld and the official news article from WSO2 for more details on this great achievement by the WSO2 Carbon team.

Wednesday, July 22, 2009

Integrating Apache ActiveMQ with WSO2 ESB

When going through some of the recent posts in the WSO2 ESB user forum, I got the impression that some folks are having trouble getting Apache ActiveMQ to work with WSO2 ESB. So today I'm going to explain how to integrate Apache ActiveMQ with WSO2 ESB and run one of the JMS sample scenarios.

I will be using WSO2 ESB 2.1 and Apache ActiveMQ 5.2. First download WSO2 ESB 2.1 and Apache ActiveMQ 5.2 from the respective websites if you already haven't done so. Apache ActiveMQ has different distributions for Windows platform and Unix/Linux platform. So remember to download the distribution that matches your target platform. To run the sample scenario described here you will also require Apache ANT. Once you have extracted the downloaded archives to some location in your local disk. Let's refer to WSO2 ESB installation directory as ESB_HOME and ActiveMQ installation directory as AMQ_HOME.

Now we are all set to go.....

First go to AMQ_HOME/bin directory and start the ActiveMQ broker. On Linux you simply have to execute the script named 'activemq'.

Then you need to copy the following 3 jar files into ESB_HOME/repository/components/lib directory. (With WSO2 ESB 2.1 this is the location where most of the 3rd party dependencies should be deployed)
  • activemq-core-5.2.0.jar
  • geronimo-j2ee-management_1.0_spec-1.0.jar
  • geronimo-jms_1.1_spec-1.1.1.jar
You will find all these jars in AMQ_HOME/lib directory.

Then open up ESB_HOME/conf/axis2.xml file in your favorite text editor and uncomment the JMS listener configuration. JMS listener configuration should look something like this.

<transportReceiver name="jms" class="org.apache.axis2.transport.jms.JMSListener">
<parameter name="myTopicConnectionFactory" locked="false">
<parameter name="java.naming.factory.initial" locked="false">
org.apache.activemq.jndi.ActiveMQInitialContextFactory
</parameter>
<parameter name="java.naming.provider.url" locked="false">
tcp://localhost:61616
</parameter>
<parameter name="transport.jms.ConnectionFactoryJNDIName" locked="false">
TopicConnectionFactory
</parameter>
<parameter name="transport.jms.ConnectionFactoryType" locked="false">topic</parameter>
</parameter>

<parameter name="myQueueConnectionFactory" locked="false">
<parameter name="java.naming.factory.initial" locked="false">
org.apache.activemq.jndi.ActiveMQInitialContextFactory
</parameter>
<parameter name="java.naming.provider.url" locked="false">
tcp://localhost:61616
</parameter>
<parameter name="transport.jms.ConnectionFactoryJNDIName" locked="false">
QueueConnectionFactory
</parameter>
<parameter name="transport.jms.ConnectionFactoryType" locked="false">queue</parameter>
</parameter>

<parameter name="default" locked="false">
<parameter name="java.naming.factory.initial" locked="false">
org.apache.activemq.jndi.ActiveMQInitialContextFactory
</parameter>
<parameter name="java.naming.provider.url" locked="false">
tcp://localhost:61616
</parameter>
<parameter name="transport.jms.ConnectionFactoryJNDIName" locked="false">
QueueConnectionFactory
</parameter>
<parameter name="transport.jms.ConnectionFactoryType" locked="false">queue</parameter>
</parameter>
</transportReceiver>
Now go to ESB_HOME/bin and start sample 250 which demonstrates how to receive messages over JMS and forward them over HTTP. To start the sample go to ESB_HOME/bin and run the command ./wso2esb-samples.sh -sn 250 if you are on Unix/Linux or run the command ./wso2esb-samples.bat -sn 250 if you are on Windows. This will bring up WSO2 ESB with sample 250 configuration.

The ESB startup may take some time depending on your system. However note the following lines on the console when it starts up.
INFO - JMSConnectionFactory JMS ConnectionFactory : myTopicConnectionFactory initialized
INFO - JMSConnectionFactory JMS ConnectionFactory : myQueueConnectionFactory initialized
INFO - JMSConnectionFactory JMS ConnectionFactory : default initialized
INFO - JMSListener JMS Transport Receiver/Listener initialized...
This confirms that the JMS transport has successfully started by connecting to the ActiveMQ broker. When the ESB has fully started up you should get a message similar to the following line on the console.
INFO - StartupFinalizerServiceComponent WSO2 Carbon started in 33 sec
Now we are ready to run the sample. Go to ESB_HOME/samples/axis2Server/src/SimpleStockQuoteService and run the command ant to build the sample service and deploy in the sample Axis2 server that comes with WSO2 ESB (This is where you need Apache ANT. So make sure you have properly installed ANT before trying to build the service and proceed any further.). Then switch back to ESB_HOME/samples/axis2Server and start the sample server by running axis2server.sh or axis2server.bat startup script.

Finally to run the sample client head over to ESB_HOME/samples/axis2Client directory and run the following command.
ant jmsclient -Djms_type=pox -Djms_dest=dynamicQueues/StockQuoteProxy -Djms_payload=MSFT
This will send a message to a JMS queue named StockQuoteProxy. The ESB will receive the message from the queue and forward it to the sample Axis2 server over HTTP. When the Axis2 server is done with processing the message it will print the following line on the console.
samples.services.SimpleStockQuoteService  :: Accepted order for : 9351 stocks of MSFT at $ 158.6569470528259
Congratulations! You just got Apache ActiveMQ integrated and working with WSO2 ESB. Now that wasn't too hard, was it? The key thing you have to remember is the way 3rd party dependencies are deployed into WSO2 ESB. In older versions of WSO2 ESB you had to copy the jar files into ESB_HOME/lib. But that does not work with the latest version of WSO2 ESB. The deployment model of WSO2 ESB has slightly changed with the introduction of WSO2 Carbon and Equinox P2 into the ESB.

So that's all about getting ActiveMQ to work with WSO2 ESB. With this knowledge now you may try other JMS related samples that come with WSO2 ESB.

Wednesday, July 15, 2009

Head First Security in SOA

No, O'Reilly Media hasn't published a book on 'Security in SOA' in their world famous Head First series (at least not that I know of). This post is about a wonderful presentation on the above mentioned subject, conducted by Prabath SiriWardena, couple of weeks back at the WSO2 Summer School. Prabath is one of my colleagues at WSO2 and he is one of the most experienced folks we got. Prabath's expertise is on computer security and at WSO2 he leads all security related projects including WSO2 Identity Server. In this summer school presentation Prabath has started simple, by explaining the fundamental concepts of computer security like confidentiality, integrity and availability and goes on to more complex topics such as public key cryptography, transport level and message level secuity, WS-Security specs and Username-Token authentication. He gives a glimpse on various options available to SOA architects and Web Service authors to secure their applications at different levels while emphasizing on the importance of interoperability.
Throughout the presentation he has kept things simple yet extremely interesting. You will find the entire presentation sort of follows the storyline based, fun-filled teaching method which is a very effective technique commonly used in the books of the Head First series (and hence the title).
If you want to learn the fundamentals of Security in SOA and how it is used in the enterprise (or how it should be used in the enterprise), this presentation would be a great starting point. So start flipping through the slides now and see for yourself.

View more documents from wso2.org.

Sunday, July 12, 2009

Amplify Your SOA with WSO2 ESB 2.1

If you have been following my blog, then you already know that WSO2 Carbon 2.0 and a host of other Carbon based WSO2 SOA products were released last week. WSO2 Enterprise Service Bus 2.1, which is one of the released products, must be highlighted as a high quality, feature rich and extremely user friendly piece of SOA middleware for a number of reasons. Like all its predecessors, this version of WSO2 ESB is also based on Apache Synapse, the lightweight, ultra-fast ESB. WSO2 ESB is generally popular among SOA enthusiasts because of the following set of key features provided by the ESB.
  • Proxy services - facilitating synchronous/asynchronous transport, interface (WSDL/Schema/Policy), message format (SOAP 1.1/1.2, POX/REST, Text, Binary), QoS (WS-Addressing/WS-Security/WS-RM) and optimization switching (MTOM/SwA).
  • Non-blocking HTTP/S transports based on Apache HttpCore for ultrafast execution and support for thousands of connections at high concurreny with constant memory usage.
  • Built in Registry/Repository, facilitating dynamic updating and reloading of the configuration and associated resources (e.g. XSLTs, XSD, WSDL, Policies, JS, Configurations ..)
  • Easily extendable via custom Java class (mediator and command)/Spring mediators, or BSF Scripting languages (Javascript, Ruby, Groovy, etc.)
  • Built in support for scheduling tasks using the Quartz scheduler.
  • Load-balancing (with or without sticky sessions)/Fail-over, and clustered Throttling and Caching support
  • WS-Security, WS-Reliable Messaging, Caching & Throttling configurable via (message/operation/service level) WS-Policies
  • Lightweight, XML and Web services centric messaging model
  • Support for industrial standards (Hessian binary web service protocol/ Financial Information eXchange protocol and optional Health Level-7 protocol)
  • Enhanced support for the VFS(File/FTP/SFTP)/JMS/Mail transports with optional TCP/UDP transports and transport switching for any of the above transports
  • Support for message splitting & aggregation using the EIP and service callouts
  • Database lookup & store support with DBMediators with reusable database connection pools
  • WS-Eventing support with event sources and event brokering
  • Rule based mediation of the messages using the Drools rule engine
  • Transactions support via the JMS transport and Transaction mediator for database mediators
  • Internationalized GUI management console with user/permission management for configuration development and monitoring support with statistics, configurable logging and tracing
  • JMX monitoring support and JMX management capabilities like, Gracefull/Forcefull shutdown/restart
Wow! That's a lot of features for a software product developed openly and distributed free of charge under Apache Software License 2.0. As you would imagine, it is mainly the performance and the lightweight operation model of WSO2 ESB which makes it stand out from the rest. In addition to the above mentioned key features the latest ESB 2.1 release brings you the following set of new features.
  • Rule based mediation via Drools
  • Fine grained authorization for services via the Entitlement mediator
  • Reliable-Messaging specification 1.1 support
  • Enhanced WS-Eventing support and Event Sources making it an even broker
  • Enhanced AJAX based sequence, endpoint and proxy service editors
  • Enhanced transport configuration management through the graphical console
  • Enhanced integrated registry and search functionalities with versioning, notifications, rating of resources, and commenting
  • Enhanced remote registry support
  • Default persistence to the registry for the configuration elements
  • Enhanced permission model with the user management
  • Enhanced REST/GET and other HTTP method support
  • P2 based OSGi feature support, for optional features like service management, runtime governance
The coolest thing about WSO2 ESB 2.1 is that it is 100% OSGi based (thanks to the Carbon platform of course!). All the features are packed into OSGi bundles and therefore adding new features and removing unnecessary features cannot get any easier. The newly introduced provisioning support based on Equinox P2 makes it particularly easy to deploy new features and third party libraries into the ESB. With WSO2 ESB 2.1, you can deploy only the features you want and only them. You are not forced to load any features/libraries that you never use. Why waste memory and other resources on features never used, right?
With ESB 2.1 registry integration support has improved vastly. WSO2 ESB 2.1 comes with an embedded WSO2 G-Reg instance but you can easily point the ESB to a remotely hosted registry instance in a matter of seconds. ESB 2.1 also has the ability to export its entire configuration to the registry and reload the configuration back from the registry at the server startup.
User interfaces and context sensitive help system have gone through lot of rework. You will find that most of the web interfaces are now fully AJAX compliant making it easy and fun to work with WSO2 ESB. All UIs are fully internationalized and can be even separated from the backend system to be hosted as different web application.
WSO2 ESB 2.1 is a giant step forward by the WSO2 folks to make their ESB even more elegant and enterprise ready. It gives you a combination of high performance, modularity and user friendliness. It is completely free and open source, with a very active and supportive community of developers to back up all the development work. WSO2 also offers user training, development support and production support to any party which requires such facilities.
If you are looking for a robust mediation solution to power your enterprise SOA or if you are tired of trying out expensive proprietary ESB solutions, it’s high time you give WSO2 ESB 2.1 a spin. It will be totally worth it!!!

Friday, July 10, 2009

WSO2 Carbon Platform Takes Another Giant Step Forward

Weeks have passed by since I did my last blog post. The reason for my prolonged silence in the blog sphere was due to the fact that I was working hard on a very important point release of WSO2 Carbon 2.0 and a host of WSO2 Java products based on the Carbon platform. Ideally these releases should have come out bit early but realizing the importance of implementing some new features, we decided to push the releases back by a few weeks. Anyway WSO2 Carbon 2.0 and four of the Carbon based WSO2 products (WSAS 3.1, ESB 2.1, G-Reg 3.0 and IS 2.0) were released on 8th July 2009 and you can now download them from the download page of the WSO2 Oxygen Tank.

WSO2 Carbon is an OSGi based application framework for SOA and Web Services. All WSO2 Java products including WSO2 ESB, WSO2 WSAS, WSO2 Governance Registry and WSO2 Identity Server are based on this revolutionary SOA platform. We have made some very important architectural and functional enhancements to WSO2 Carbon recently. Therefore the users of Carbon 2.0 based products will be able to reap the benefits of those improvements in the forms of improved performance, reliability, extensibility, user friendliness and stability.

One of the most important architectural changes we made to the Carbon platform this time around is getting rid of OSGi bundle activators and instead, adapting OSGi declarative services to handle bundle initialization and cleanup. OSGi declarative services are considered the best solution when it comes to managing systems with a large number of OSGi bundles. Declarative services allow bundles to startup and initialize properly while sharing required data among various bundles without following a pre configured bundle startup order. Declarative services also helped us improve the dynamic nature of the overall Carbon platform, so now starting bundles and stopping bundles at runtime is easier and safer.

Another key enhancement we did for this release of Carbon is the introduction of the P2 based provisioning system. This work is still at its early stages but it already enables Carbon and Carbon based product users to easily deploy Carbon components, user developed OSGi bundles, mediators and third party dependencies to the system easily, without having to write a single line of code to handle OSGi initialization or cleanup work.

In General Carbon 2.0 and Carbon 2.0 products have better registry integration support, better transport management support, better user management support, better security features and better user interfaces. We gave most of the Carbon component UIs a fresh look through the extended use of AJAX. Persistence of configuration data is another area where we have done a lot of work lately. WSO2 ESB 2.1 in particular has the ability to store the entire ESB configuration in a registry and then load the configuration back from the registry during server startup.

Documentation is yet another area that’s been largely improved with this release. We paid special attention to improving our context sensitive help documents (accessed via product user interfaces) and other downloadable guides and tutorials. In the previous releases of Carbon and Carbon based products we were mostly focused on system architecture and functionality. But now the Carbon framework is largely stabilized we were able to spare some cycles for improving our documentation too. We have added lots of new guides and catalogs including mediator catalog, transports catalog, server administration guide and the endpoints guide. Our plan is to make our products easy to learn and use via making our user interfaces simple, integrating help with the user interfaces and making ample documentation freely available to all.

In addition to the key improvements mentioned above Carbon 2.0 and related products come with tons of new features, minor bug fixes, performance enhancements and usability improvements which add lot of value to the WSO2 Carbon SOA platform. If you are interested in SOA and Web Services middleware you must give some of the new Carbon 2.0 based WSO2 products a try. After all it’s totally free and open source so it doesn’t cost you a penny to try our software. I guarantee that it would be a great experience and after that you will love WSO2 products.

On a finishing note I would like to quote the WSO2 Carbon 2.0 release note here….

WSO2 Carbon 2.0.0 - Middleware a' la carte

Welcome to the WSO2 Carbon 2.0.0 release. This release is available for download at http://wso2.org/projects/carbon

WSO2 Carbon is the base platform for all WSO2 Java products. Built on OSGi, Carbon encapsulates major SOA functionality such as data services, business process management, ESB routing/transformation, rules, security, throttling, caching, logging and monitoring. These product capabilities are no longer tied to individual products, but are available as components.

A Carbon feature consists of one or more Carbon components. These are nothing but Eclipse equinox P2 features. In order to extend the functionality of you Carbon server, simply install new features onto you server as outlined in https://wso2.org/wiki/display/carbon/p2-based-provisioning-support

Key Features
  1. Extensible OSGi component based architecture
  2. P2 provisioning based feature enhancement of the server
  3. Unified server management framework
  4. Unified Management Console
  5. Web service, JMX & Equinox OSGi console based administration
  6. Integrated security & permissions management
New Features In This Release
  • Experimental Equinox P2 based provisioning support - extend your Carbon instance by installing new P2 features (See https://wso2.org/wiki/display/carbon/p2-based-provisioning-support)
  • Fixed start levels eliminated
  • Performance improvements to the Registry
  • Ability to make normal jar files into OSGi bundle (Just copy the jar files into CARBON_HOME/repository/components/lib)
  • Various bug fixes and enhancements including architectural improvements to Apache Axis2, Apache Rampart, Apache Sandesha2 , WSO2 Carbon and other projects, including security fixes
How to Run
  1. Extract the downloaded zip
  2. Go to the bin directory in the extracted folder
  3. Run the wso2server.sh or wso2server.bat as appropriate
  4. Point you browser to the URL https://localhost:9443/carbon/
  5. Use "admin", "admin" as the username and password.
  6. If you need to start the OSGi console with the server use the property -DosgiConsole when starting the server
For more details, run, wso2server.sh (wso2server.bat) --help

How to Install Additional Features

You can build your own server by selecting only the features that you require
For further details refer to
Known Issues

All known issues have been recorded at
Training

WSO2 Inc. offers a variety of professional Training Programs, including training on general web services as well as WSO2 Carbon, Apache Axis2, Data Services and a number of other products.

For additional support information please refer to
Support

WSO2 Inc. offers a variety of development and production support programs, ranging from web-based support up through normal business hours, to premium 24x7 phone support.

For additional support information please refer to
For more information on WSO2 Carbon, visit the WSO2 Oxygen Tank (http://wso2.org)

Friday, May 8, 2009

Terminator is Here! Make Your Judgement!

I recently installed 'Terminator' on my laptop which is running Ubuntu Gutsy. Terminator is a neat little shell client for Linux and many other platforms, which enables you to split the shell screen horizontally and vertically into multiple shell screens. This is a feature that I've always longed for.

As a software developer I usually have to work with multiple applications and multiple shell instances at the same time. For example, very often I fire off my IDE from one shell instance, run my Maven builds in another shell instance, interact with SVN from another shell instance and browse the local file system from another shell instance. Most traditional shell clients attempt to address this requirement by providing tabs. Tabs are great but keeping track of which application is running in which tab and switching between them accordingly can be a real pain. It becomes an unavoidable annoyance when you open up more than 3 tabs.

In my opinion, Terminator gives you the most optimal solution for this problem by giving the ability to split a single shell screen into multiple shell screens. You can see all the shell instances you have opened up on your screen at one glance and switching between them is lot more easier than having to switch between tabs. Splitting the shell screen is also easy with Terminator. Simply right click on the Terminator shell and select one of the split options available from the context menu that appears. Following is a little screen shot of Terminator that I took when working with four shell instances. It clearly illustrates the power of Terminator.

Installing Terminator on Ubuntu systems is also pretty easy. Simply add the following line to your sources.list file, update the apt cache and type 'sudo apt-get install terminator' to install the application. Piece of cake!!
deb http://ppa.launchpad.net/gnome-terminator/ubuntu gutsy main restricted universe multiverse
(Depending on the version of your Ubuntu installation, you might have to edit this line)

If you often happen to work with many shell screens at once you'll definitely love 'Terminator'. So install 'Terminator' today and join the fun!!

Saturday, May 2, 2009

A 'Good' ESB Should....

As technologies like SOA and Web Services continue to become more and more dominant mechanisms for implementing complex distributed systems, the demand for efficient and reliable enterprise service bus middleware is becoming larger and larger. There are dozens of potential ESB solutions out there, some open source and some proprietary, but the cold hearted truth is most of these products have a number of short comings, which makes them totally useless in production environments. Production environments don't require fast ESBs. They need ultra fast ESBs that can handle thousands of concurrent user requests. such deployments require middleware which can satisfy scalability and availability requirements through features such as load balancing, clustering and fail over support. A good ESB should also be capable of dealing with many communication protocols, transport mechanisms and messaging standards.

Fortunately we are not totally out of hope. There are some really good products out there which give you all the above mentioned features and deliver 100% in production deployments. WSO2 ESB is certainly one of those middleware solutions which is fast, reliable and feature rich. It is based on Apache's tried and tested Apache Synapse light weight ESB and starting from version 2.0 it is also based on WSO2's revolutionary Carbon framework.

WSO2 folks recently published a cool flash presentation which walks us through all the basic features of WSO2 ESB within a few minutes. Have a look and see whether your ESB delivers at least half of the things the WSO2 ESB provides.

Saturday, April 25, 2009

Summer of Code is Back

Google Summer of Code 2009, the annual open source feast organized by the Internet giant Google is now underway. I also applied for the contest and I'm pleased to announce that my project proposal to implement SQL authorization support for Apache Derby dblook has been accepted. So that makes me a GSoC winner, two times in a row. Last year I implemented XML Schema 1.1 type alternatives support for Apache Xerces2/J under the guidance of Khaled Noaman. This year Dag Wanvik will be mentoring my project. 

I'm eagerly looking forward to complete this task in time and of course in classy fashion. Apache Derby community is really active, dynamic and supportive. I feel gifted to get an opportunity to work with such a passionate group of committers. And not to mention this is going to be a great learning experience as well as a genuine test of skill for me.

On the sad side, this will probably be the last GSoC I'm going to take part as a student of the University of Moratuwa. I will be officially passing out from the University in a couple of months time. University of Moratuwa became the no. 1 ranked institute in last year's GSoC which made us really happy and proud of ourselves. I'm confident that my University has ranked pretty high this year too (Google haven't released the numbers as of yet). So that means this is the last time I get to enjoy being on top of the world in GSoC :(