Back to WSO2 ESB Tips and Tricks!
Today we are going to see how to implement a transport switching scenario with WSO2 ESB. WSO2 ESB supports receiving and sending messages over following transport and application layer protocols.
- HTTP/HTTPS
- Mail protocols (POP3, IMAP, SMTP)
- JMS / AMQP
- VFS (Virtual File System)
- FIX (Financial Information eXchange)
- TCP
- UDP
With WSO2 ESB having support for such a wide range of transports, it is easy to implement a scenario which involves receiving messages over one protocol and forwarding them over another. As an example I’m going to explain how to receive messages over HTTP and forward them over JMS, using Apache Active MQ as the JMS provider. Looking at how most system integrators use WSO2 ESB it seems this is one of the most common use cases for ESB products.
The first thing we have to do is enable the JMS transport sender in the ESB. By default only the HTTP and HTTPS transports are enabled in the ESB configuration. But configuring and enabling other transports is a trivial task. Transports can be enabled by uncommenting the corresponding entries in the axis2.xml file or by using the ESB management console.
First, shutdown the ESB if it is already running. Then we need to deploy the Active MQ JMS client libraries into the ESB runtime. Download and extract an Apache Active MQ binary distribution (I prefer v5.2). Copy the following jar files from the Active MQ lib directory to the ESB_HOME/repository/components/lib directory.
- geronimo-j2ee_management.jar
- activemq-core.jar
Also this would be a good time to start the Active MQ broker.
Now start the ESB. The underlying Carbon platform will detect the newly deployed jar files and automagically convert them into OSGi bundles on the fly. Once the server has started go to the ESB_HOME/repository/components/dropins directory and do a file listing. You will see a set of OSGi bundles created out of the jar files you deployed.
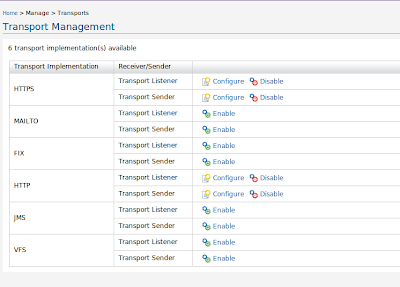
Now that the server is up and running login to the management console as an admin. Click on ‘Transports’ under ‘Manage’ on the left navigation bar. A list of available transport receivers and senders will be displayed.

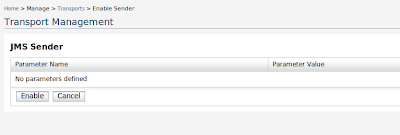
Select the ‘Enable’ option for the JMS sender. Click on ‘Enable’ to start the JMS transport sender. Once started, you can further configure the transport by specifying various parameters. But for this demonstration we can go ahead with the default settings (ie no parameters).

If you prefer to enable the JMS sender the old school way open up the axis2.xml file in the conf directory and uncomment the following entry before starting the ESB.
<transportSender name="jms" class="org.apache.axis2.transport.jms.JMSSender"/>
Having enabled the JMS sender, we should now create a proxy service which will accept messages over HTTP and send them to a JMS endpoint. Click on ‘Add’ under ‘Proxy Services’ to start the proxy service creation wizard. On the first step simply specify a suitable name for the service (eg: JMSBridge) and click on ‘Next’.

On the second step of the wizard, create an anonymous in-sequence consisting of a property mediator. Configure the property mediator to set the ‘OUT_ONLY’ property to the value ‘true’. Save the in-sequence and create an anonymous endpoint for the proxy service. Specify the following JMS EPR as the target address. This EPR points to a dynamic queue named ‘SimpleStockQuoteService’ in Apache Active MQ broker.
jms:/SimpleStockQuoteService?transport.jms.ConnectionFactoryJNDIName=QueueConnectionFactory&java.naming.factory.initial=org.apache.activemq.jndi.ActiveMQInitialContextFactory&java.naming.provider.url=tcp://localhost:61616&transport.jms.DestinationType=queue
In this scenario we will be doing a one-way invocation using the sample client application. In other words, the client sends a message to the ESB but does not expect a response in return. So the ESB should not expect a response from the backend JMS service either. We indicate this to the ESB by setting the OUT_ONLY property in the in-sequence of the proxy service. ESB will not register any call backs for messages containing the OUT_ONLY property thus no response would be expected.
Having specified the in-sequence and the target endpoint click on ‘Next’ to proceed to the third step of the wizard. Leave the out-sequence and the fault-sequence settings unchanged and simply click on ‘Finish’ to save and exit the wizard. A new proxy service will be deployed on the ESB at this point.
If you prefer to create the above proxy using the ESB configuration language you can use the XML snippet given below.
<syn:proxy name="JMSBridge" transports="https http" startOnLoad="true" trace="disable">
<syn:target>
   <syn:endpoint>
      <syn:address uri="jms:/SimpleStockQuoteService?transport.jms.ConnectionFactoryJNDIName=QueueConnectionFactory&java.naming.factory.initial=org.apache.activemq.jndi.ActiveMQInitialContextFactory&java.naming.provider.url=tcp://localhost:61616&transport.jms.DestinationType=queue"/>
   </syn:endpoint>
   <syn:inSequence>
      <syn:property name="OUT_ONLY" value="true" scope="default"/>
   </syn:inSequence>
</syn:target>
</syn:proxy>
On the management console, click on the ‘Synapse’ link under ‘Configure’ and add the above XML as a child of the top level ‘definitions’ element. Click ‘Update’ to apply the changes.
Now we are all set to run the scenario. Deploy the SimpleStockQuoteService into the sample Axis2 server. Open up the axis2.xml file for the sample Axis2 server and enable the JMS transport receiver in it. This file can be found at samples/axis2Server/repository/conf directory. To enable the JMS listener uncomment the following XML fragment.
<transportReceiver name="jms" class="org.apache.axis2.transport.jms.JMSListener">
......
</transportReceiver>
Finally start the sample Axis2 server. Since we have enabled the JMS receiver for the sample server, the SimpleStockQuote service will be exposed over JMS and the server will start listening on a JMS queue named ‘SimpleStockQuoteService’. When you haven’t specified a queue name in the service configuration, the Axis2 JMS transport will by default listen on a queue with the same name as the service. To explicitly specify the queue name for a service one must set the transport.jms.Destination parameter as a service parameter (ie in the services.xml file).
Finally go to samples/axisClient and run the following command to send a one-way message to the ESB proxy service over HTTP. (Here we invoke the in-only placeOrder operation on the backend service)
ant stockquote –Daddurl=http://localhost:8280/services/JMSBridge –Dmode=placeorder
The ESB will take the message and forward it over JMS to the queue named ‘SimpleStockQuoteService’. The sample Axis2 server which is currently listening on this queue will pick up the message and process it. Note the following log entry in the Axis2 server log when it takes the message from the JMS queue.
Sun Dec 13 16:15:39 IST 2009 samples.services.SimpleStockQuoteService :: Accepted order for : 5789 stocks of IBM at $ 89.61765128551305
So there you have it. The proxy service abstraction in WSO2 ESB makes it extremely simple to perform protocol conversions and route messages back and forth. I suggest you also have a look at the set of transport switching samples that come with WSO2 ESB distribution. We got samples covering all the major protocols and even some of the domain specific transports like FIX and AMQP.
In my next post, I will focus on common problems that most developers encounter while implementing transport switching scenarios involving JMS and possible solutions to such pitfalls.

No comments:
Post a Comment